Setting up Terraform and UltraDNS
The code consists of the two files main.tf and variables.tf The main.tf file contains all the yummy declarative language that will be used to provision your assets whereas variables.tf contains the definition of variables and their default values. As an example, here is how we have defined the variable that will hold the owner name and IP address for each of the records:
variable “a-hosts” {
type = map
description = “List of a record owners to setup in UltraDNS.”
default = {
“api” = “10.10.10.1”,
“dev” = “10.10.10.2”,
“home” = “10.10.10.3”,
“login” = “10.10.10.4”,
“mail” = “10.10.10.5”,
“prod” = “192.168.1.1”,
“product” = “192.168.1.2”,
“proxy” = “192.168.1.3”,
“search” = “192.168.1.4”,
“stage” = “172.16.1.1”,
“support” = “172.16.1.2”,
“www” = “172.16.1.3”,
“www2” = “172.16.1.4”
}
}
Each variable is defined in variables.tf contains inline descriptions so that their purpose should be clear. The other variables are the username and password of your UltraDNS account, while new-zone is the name of the zone to which we are going to create and add A records. Find the TODO items in the variables.tf file and update with your UltraDNS account information.
Writing Terraform configuration files
Where the variables.tf file provides the parameter input, the main.tf file uses those inputs and performs the heavy lifting of automating cloud resource provisioning. We start with the code for configuring Terraform and our Provider:
terraform {
required_providers {
ultradns = {
source = “ultradns/ultradns”
version = “1.0.4”
}
}
}
provider “ultradns” {
username = var.username
password = var.password
hosturl = “https://api.ultradns.com/“
}
When you have this code in your main.tf file you will want to run the following command to initialize everything:
cli> terraform init
Then you can start adding all the code that handles the provisioning of resources. Here’s the code for creating the zone:
resource “ultradns_zone” “new-zone” {
name = var.new-zone
account_name = var.account
type = “PRIMARY”
change_comment = “Zone creted by Terraform.”
primary_create_info {
create_type = “NEW”
inherit = “NONE”
}
}
This will cause a new Primary zone to be created in my UltraDNS account and will not inherit the account level zone transfer settings. That last bit of code was very straightforward because we’re just setting up a single zone. This next bit of provisioning code is a single block that is responsible for creating all our A records:
resource “ultradns_record” “a” {
for_each = var.a-hosts
owner_name = each.key
record_data = [each.value]
zone_name = var.new-zone
record_type = “A”
ttl = 600
depends_on = [ultradns_zone.new-zone]
}
In the above code Terraform will cycle through the entries in the a-hosts variable and create a provisioning object for each of those key/value pairs.
Automating DNS record provisioning
The final part of code in main.tf is there to display the number of records that were configured. This is a quick check to make sure our code worked as expected:
output “new-zone-record-count” {
value = ultradns_zone.new-zone.resource_record_count
}
Now you can run the following commands:
// Always good to preview your changes by inspecting the execution plan.
cli> terraform plan
// Then apply those changes to deploy the zone and A files.
cli> terraform apply
Provisioning done by Terraform is idempotent so if you run terraform apply multiple times (without changing main.tf/variables.tf) there will be no change in your deployment. You may notice that the output displayed “new-zone-record-count = 3”. This output value shows the number of records in the newly created zone (2 NS records and 1 SOA record). If you run terraform apply again the output will now show a total of 16 records for new-zone-record-count.
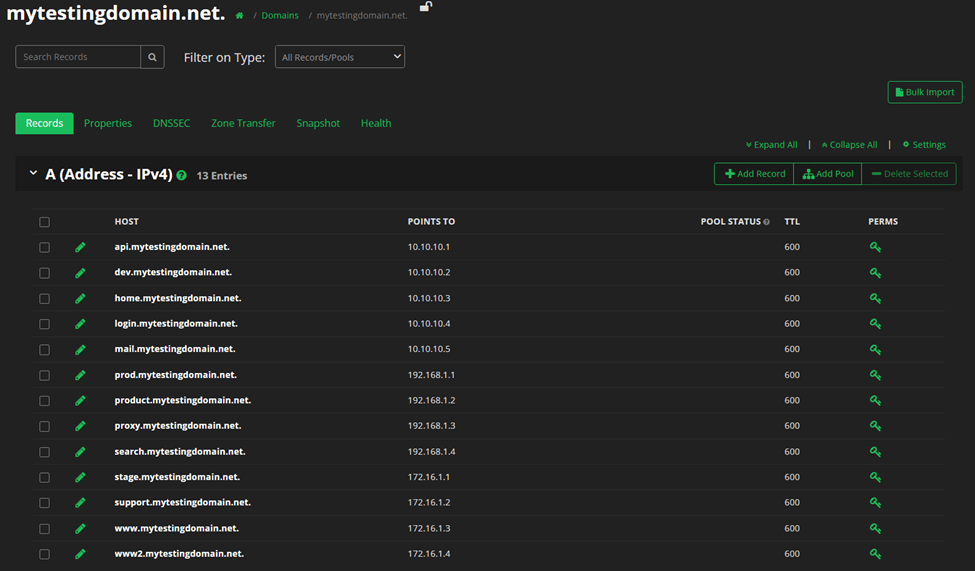
Check your UltraDNS account to confirm that your zone and A records were configured properly:
Once you are done with testing, we recommend cleaning up any unnecessary zones and records. Since Terraform maintains the state of the configuration in the terraform.tfstate file you can run the following command to rollback the changes made:
// Clean up my test deployment.
cli> terraform destroy
Streamlining cloud deployments with Terraform and Vercara
Terraform provides a consistent tool for deploying public and private cloud resources across various providers and allows DevOps teams to automate their deployments using Infrastructure as Code (IaC). Workloads are moving to the cloud and many companies prefer a multi-provider DNS environment to ensure availability of critical applications. Vercara continues to enable global businesses to thrive online, tools like Terraform can help simplify and automate cloud deployments while reducing the total cost of ownership of services like DNS.